Installation Guide
SADMIN Ecosystem
-
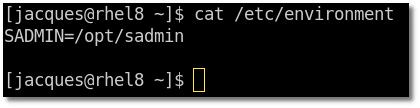
The ‘SADMIN’ environment variable is critical for the SADMIN tools and contain the installation directory name. The setup script will make sure that this environment variable is set properly and that it’s persistent after a reboot.
- To do so, the setup script create “/etc/profile.d/sadmin.sh” that’s executed every time you login and to ease the use of the SADMIN tools, directories ‘$SADMIN/bin’ & $SADMIN/usr/bin are added to the PATH. It also modify the “/etc/environment” so it contain SADMIN install directory.
- We recommend installing the SADMIN tools in ‘/opt/sadmin’, but you can install it in the directory of your choice. We recommend around 5Gb of free space for the SADMIN server and 400Mb for each client.
IMPORTANT
You need to have an internet access on the system when you are installing the SADMIN tools.
Some of the packages needed by SADMIN, may not be present
on your system and will need to be downloaded. On Redhat and CentOS the
“EPEL repository” is activated at installation time and
disable afterward. On other distribution the packages needed are available in the distribution
repository and will be install automatically.
Summary of installation
Installation must be executed by ‘root’ user or with ‘sudo’. We recommend using ‘/opt/sadmin’ for the install directory, but you can select the directory of your choice. Instruction below assume you have chosen to install SADMIN in ‘/opt/sadmin’ directory. The setup script is used to install either the SADMIN client or server.
Installation Method 1
Install using the github repository (Recommended)
The ‘git’ command is not installed by default on some distribution, you may have to install it.
    # apt update ; apt install git   (Ubuntu, Debian, Raspbian, ...)
    # dnf -y install git             (Red Hat, CentOS, Fedora, ...)
Once ‘git’ command is installed, we can now proceed with the installation.
    # cd /opt                                   # Change Dir. to /opt
    # git clone https://github.com/jadupl2/sadmin.git
    # /opt/sadmin/setup/setup.sh                # Run setup script
Installation Method 2
Install using the downloaded ‘tgz’ file from our download page.
    # cp sadmin_xx.xx.xx.tgz /opt               # Copy sadmin tgz to /opt
    # mkdir /opt/sadmin                         # Create sadmin directory
    # cd /opt/sadmin                            # Change Dir. to /opt/sadmin
    # tar -xvzf ../sadmin_xx.xx.xx.tgz          # Untar tgz
    # /opt/sadmin/setup/setup.sh                # Run setup script
The Setup script
Whether you are installing a SADMIN client or server, they both need “python3” and the “lsb_release” command installed. So the first thing the setup script will do, is to verify that they are installed, if there not, the setup script will be installed them. If it’s not able to installed them, you will be notified and the script will terminate.
The setup script will ask some questions regarding your environment. Your answers are store in the SADMIN configuration file ($SADMIN/cfg/sadmin.cfg). This configuration file is used by the web interface and by all the SADMIN tools scripts. The scripts you create will also use it and it will add flexibility to your SADMIN environment. The configuration file can be modified after running the setup script, if you need to.
The setup script can be run more than once, so don’t worry if you made a mistake, just run it again. If there are missing packages (see required packages), the setup program will install them for you. You will be asked what type of installation you want, a ‘SADMIN server’ or a ‘SADMIN client’. As an example, I have kept the setup log of an installation that were done on a CentOS 7 server.
- If you are installing a ‘SADMIN server’:
- Setup script will install and configure for you the ‘Mariadb’ (Database) and the Apache web server. At the end of the installation you will have a working Web SADMIN environment at ‘https://sadmin’ or ‘http://localhost’.
After running the setup script, you need to log out and log back in before using SADMIN Tools or type the command below.
sudo source /etc/profile.d/sadmin.sh
This will make sure “SADMIN” environment variable is define.
The installation is now completed :
- If you have installed a SADMIN server take a look at the web interface at http://
FQDN of your serveror https://sadmin or http://localhost (if you are on the server).. - If you have installed a client, you need to add your client via the web interface and setup the ssh keys for that client. See the instruction on how-to add a client to SADMIN.