How-to add a SADMIN client
Steps to add a SADMIN client
Each of these steps are described below.
(1) Add the server with the web interface
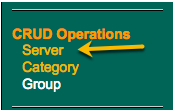
To add a client to SADMIN server inventory, click on “Server” in the “CRUD Operations” ([C]reate [R]ead [U]pdate [D]elete) section at the bottom left of the page.
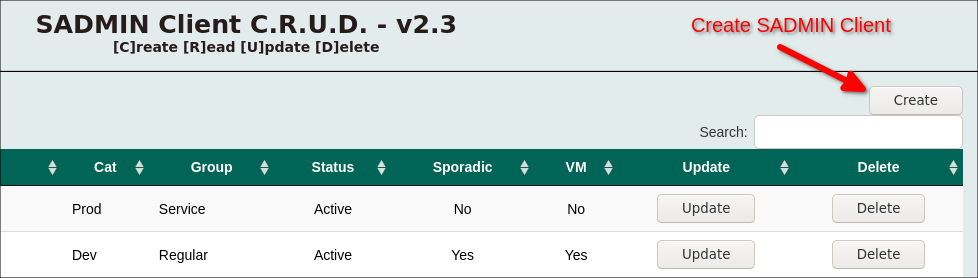
You will be directed to a page that list all your actual SADMIN clients. With this view you can “Create”, “Read”, “Update” and “Delete” client to the server database. To add a new server into SADMIN inventory, simply press the “Create” button at the top right of the page.
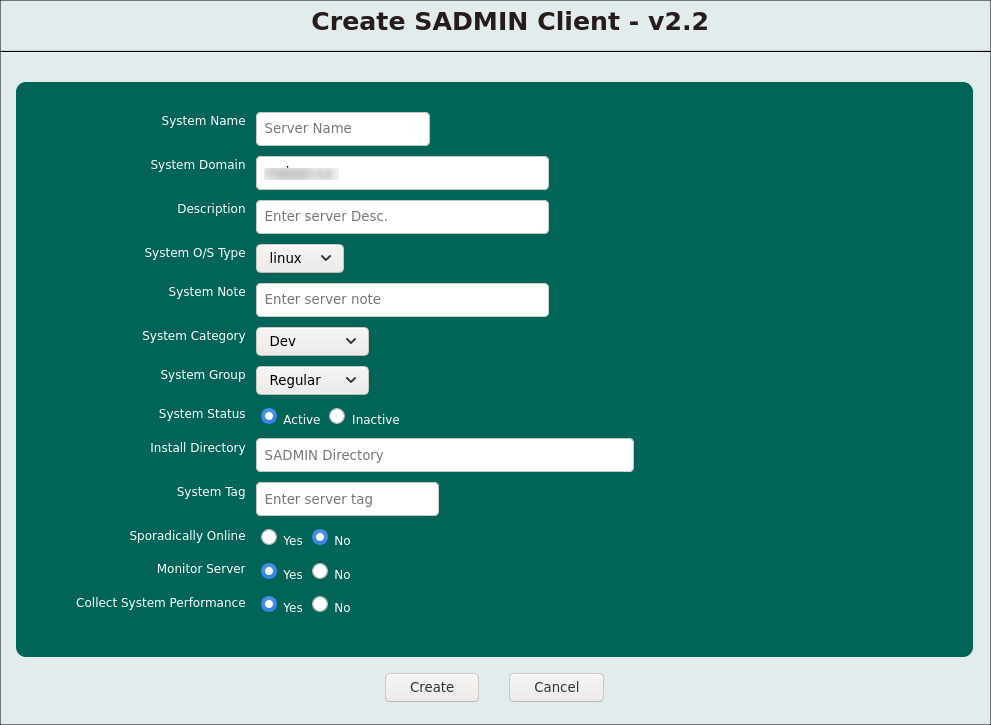
The page below will then appear and you need to enter the information concerning the SADMIN client you want to add. You can come back later in “Update” mode to modify any of these information. When all the information are entered, just press the “Create” button at the button of the screen.
(2) Add the SADMIN ‘root’ user public key to the new client
Every day your new SADMIN client will produce performance data (via nmon), information that may be used for disaster recovery situation, monitoring reports, start scheduled O/S update, scripts results (log and rch files) that will inform you about the status of your systems. To do all those things, the SADMIN server need to have root access to client via ssh.
To automate the ssh access and to do it in a safely and secure manner we will use the ‘public-key authentication’. So this automated access will be only be possible from the SADMIN server to the clients. Any systems or users that tries to SSH to your SADMIN clients using the ‘root’ user, will get the ‘Permission denied’ message or use your standard authentication method.
In this example, the SADMIN server name will be ‘borg.maison.ca’ and the SADMIN client “ubuntu2104.maison.ca”. We assume that you have a running SSH service running on the client, if you don’t, you should install the SSH server on your client. You also need the ‘root’ user password of the SADMIN server and the new client that we want to add. We will demonstrate how to automate the ssh login from ‘borg.maison.ca’ to ‘ubuntu2104.maison.ca’.
Step 2A - Change temporarily /etc/sshd_config on the new client
-
First make a copy of your actual ssh server configuration file.
cp /etc/ssh/sshd_config /etc/ssh/sshd_config.bak
We will need to restore this backup later, so please make this backup. - Check our current setting for “PermitRootLogin” option.
# grep -i PermitRootLogin /etc/ssh/sshd_config #PermitRootLogin prohibit-password # the setting of "PermitRootLogin without-password". - The goal here is to change “#PermitRootLogin prohibit-password” to “PermitRootLogin yes”.
- If the “PermitRootLogin” option is already set to “yes”, proceed with step B.
- Enter the commands below to achieve this goal.
- First let’s change the “prohibit-password” to “yes”, to do that we use the ‘sed’ command.
  # sed -i -e 's/prohibit-password/yes/g' /etc/ssh/sshd_config

  # grep -i PermitRootLogin /etc/ssh/sshd_config
  #PermitRootLogin yes
  # the setting of "PermitRootLogin without-password".
After verifying with the same grep command use before, we can see that our change went well.
- Next we need to remove the ‘#’ in front of the option and change “#PermitRootLogin” to “PermitRootLogin”.
# sed -i -e 's/#PermitRootLogin/PermitRootLogin/g' /etc/ssh/sshd_config # grep -i PermitRootLogin /etc/ssh/sshd_config PermitRootLogin yes # the setting of "PermitRootLogin without-password". - Now that change are done, we need to restart our sshd service on our client and check the status of it. As you can see below that our ssh service is now running with success.
    # systemctl restart sshd

    # systemctl status sshd
    ● ssh.service - OpenBSD Secure Shell server
     Loaded: loaded (/lib/systemd/system/ssh.service; enabled; vendor preset: enabled)
     Active: active (running) since Tue 2021-05-18 10:10:24 EDT; 5s ago
       Docs: man:sshd(8)
             man:sshd_config(5)
    Process: 3498 ExecStartPre=/usr/sbin/sshd -t (code=exited, status=0/SUCCESS)
   Main PID: 3499 (sshd)
      Tasks: 1 (limit: 2296)
     Memory: 1.0M
     CGroup: /system.slice/ssh.service
             └─3499 sshd: /usr/sbin/sshd -D [listener] 0 of 10-100 startups

May 18 10:10:24 ubuntu2104 systemd[1]: Stopping OpenBSD Secure Shell server...
May 18 10:10:24 ubuntu2104 sshd[3499]: Server listening on 0.0.0.0 port 22.
May 18 10:10:24 ubuntu2104 systemd[1]: ssh.service: Succeeded.
May 18 10:10:24 ubuntu2104 sshd[3499]: Server listening on :: port 22.
May 18 10:10:24 ubuntu2104 systemd[1]: Stopped OpenBSD Secure Shell server.
May 18 10:10:24 ubuntu2104 systemd[1]: Starting OpenBSD Secure Shell server...
May 18 10:10:24 ubuntu2104 systemd[1]: Started OpenBSD Secure Shell server.
Step 2B - Copy SADMIN server public key to our new client
- Back on the SADMIN server.
- We need to append the SADMIN server root user public key (/root/.ssh//id_rsa.pub) to “$HOME/.ssh/authorized_keys” file on our new client. We will do that, using the “ssh-copy-id”. Follow the instructions below to do so.
root@borg:~  # pwd
/root
root@borg:~  # ls -l .ssh
total 16
-rw------- 1 root root  801 May 27  2019 authorized_keys
-rw------- 1 root root 3369 Jan 23 16:14 id_rsa
-rw-r--r-- 1 root root  730 Jan 23 16:14 id_rsa.pub
-rw-r--r-- 1 root root 1875 Mar 29 12:45 known_hosts

root@borg:~  # ssh-copy-id -p22 -f -i /root/.ssh/id_rsa.pub ubuntu2104
/usr/bin/ssh-copy-id: INFO: Source of key(s) to be installed: "/root/.ssh/id_rsa.pub"
The authenticity of host 'ubuntu2104 (192.168.1.35)' can't be established.
ECDSA key fingerprint is SHA256:Ir8iB+Rc3TGtk9y+RI/mx1UQFNb2pEKi+67XdQFE4zY.
Are you sure you want to continue connecting (yes/no/[fingerprint])? yes
root@ubuntu2104's password:

Number of key(s) added: 1

Now try logging into the machine, with:   "ssh -p '22' 'ubuntu2104'"
and check to make sure that only the key(s) you wanted were added.
root@borg:~  #
- Now we should be able to connect to our client with interaction.
- We can see that it is working well.
root@borg:~  # ssh ubuntu2104
ssh: connect to host ubuntu2104 port 32: Connection refused
root@borg:~  # ssh ubuntu2104
Welcome to Ubuntu 21.04 (GNU/Linux 5.11.0-17-generic x86_64)

 * Documentation:  https://help.ubuntu.com
 * Management:     https://landscape.canonical.com
 * Support:        https://ubuntu.com/advantage
root@ubuntu2104:~#
- We need to do the same using the FQDN of the user, so let’s do that for “ubuntu2104.maison.ca”.
root@borg:~  # ssh ubuntu2104.maison.ca
The authenticity of host 'ubuntu2104.maison.ca (192.168.1.35)' can't be established.
ECDSA key fingerprint is SHA256:Ir8iB+Rc3TGtk9y+RI/mx1UQFNb2pEKi+67XdQFE4zY.
Are you sure you want to continue connecting (yes/no/[fingerprint])? yes
Warning: Permanently added 'ubuntu2104.maison.ca' (ECDSA) to the list of known hosts.
Welcome to Ubuntu 21.04 (GNU/Linux 5.11.0-17-generic x86_64)

 * Documentation:  https://help.ubuntu.com
 * Management:     https://landscape.canonical.com
 * Support:        https://ubuntu.com/advantage

Last login: Tue May 18 10:28:11 2021 from 192.168.1.38
root@ubuntu2104:~#
Step 2C - Restore our backup of sshd_config on new client
-
Back on our new client, let’s restore our original sshd_config file from our backup
root@ubuntu2104:/etc/ssh# cp sshd_config.bak sshd_config -
Restart our SSH service with our original configuration.
root@ubuntu2104:/etc/ssh# systemctl restart sshd
root@ubuntu2104:/etc/ssh# systemctl status sshd
● ssh.service - OpenBSD Secure Shell server
     Loaded: loaded (/lib/systemd/system/ssh.service; enabled; vendor preset: enabled)
     Active: active (running) since Tue 2021-05-18 10:35:22 EDT; 6s ago
       Docs: man:sshd(8)
             man:sshd_config(5)
    Process: 4088 ExecStartPre=/usr/sbin/sshd -t (code=exited, status=0/SUCCESS)
   Main PID: 4089 (sshd)
      Tasks: 1 (limit: 2296)
     Memory: 1.0M
     CGroup: /system.slice/ssh.service
             └─4089 sshd: /usr/sbin/sshd -D [listener] 0 of 10-100 startups

May 18 10:35:22 ubuntu2104 systemd[1]: Starting OpenBSD Secure Shell server...
May 18 10:35:22 ubuntu2104 sshd[4089]: Server listening on 0.0.0.0 port 22.
May 18 10:35:22 ubuntu2104 sshd[4089]: Server listening on :: port 22.
May 18 10:35:22 ubuntu2104 systemd[1]: Started OpenBSD Secure Shell server.
root@ubuntu2104:/etc/ssh#
Step 2D - Finalize our automated connection to the new client
- We need to run the two commands below to finalize our automated connection to ‘ubuntu2104’. As you can see, we where able to display the system date on ‘ubuntu2104’ without having to enter a password (Success!).
Important:
We need to finalize the automated connection with and without the domain name for SADMIN to work
as expected.
root@borg:~  # ssh ubuntu2104 date
Tue 18 May 2021 10:41:41 AM EDT

root@borg:~  # ssh ubuntu2104.maison.ca date
Tue 18 May 2021 10:41:49 AM EDT
root@borg:~  #
Our client is now configure to work with SADMIN.
AUTHOR
Jacques Duplessis
Any suggestions or bug report can be submitted at the support page
COPYRIGHT
Copyright © 2022 Free Software Foundation, Inc. License GPLv3+: GNU GPL version 3 or later
This is free software, you are free to change and redistribute it.
There is NO WARRANTY to the extent permitted by law.
SEE ALSO
How-to Remove a client - How-to remove a client from SADMIN inventory